
Webgains Transaction Management
Our Transaction Management tool gives you a single, central place to review and manage adjustable Webgains-tracked orders with confidence.
From here, you can confirm, cancel, or amend transactions to keep order values accurate and up to date. This can be done for a single advertiser program or multiple programs for a single advertiser.
The tool supports both transaction-level management and item-level adjustments, so you can view a full order or drill down into the individual tracked items within it. For example, if one item in a larger order is returned, you can cancel that item only and the overall transaction value will update accordingly.
The Transaction Management tool will only show transactions/items that are still within their ‘editable’ state. If a transaction has already been confirmed or cancelled, it will not be included in this tool, but you can still use our Reporting to view the transaction details.
Before You Start: Transactions vs Items
A transaction represents the entire order.
An item represents an individual product or line within that order.
Use the action that matches the change you are trying to make:
|
I need to... |
Use |
|---|---|
|
Approve an entire order |
Confirm Transaction |
|
Cancel an entire order |
Cancel Transaction |
|
Cancel one product within an order |
Cancel Item |
|
Change the value of one product within an order |
Adjust Item |
If your change affects the entire order, work from the Transactions tab.
If your change affects only part of an order, work from the Items tab.
For each action, you will be able to either use the UI tool directly, or use bulk management. For processing small numbers of transactions, it’s easiest to confirm them within the UI. For larger volumes of transactions or items to process, you can use bulk management.
Overviews are provided below, and more detailed instructions for bulk management can be viewed here: Transaction & Item Adjustments for Bulk Management
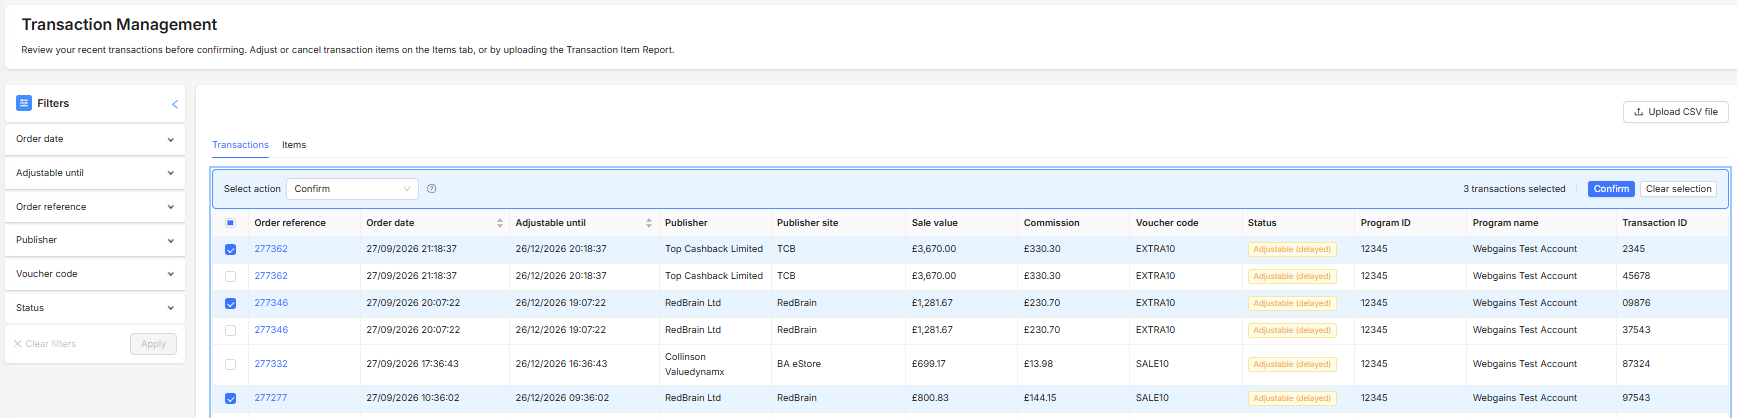
How do I approve (confirm) transactions?
Use this when the entire transaction is valid and no further changes are required.
Within Transaction Management:
Option 1: Confirm through the UI
(Use this if you are confirming smaller volumes of transactions)
-
View the Transactions tab.
-
Find the transaction(s) you want to approve within the table. You can also filter the transactions using the filters, which include Program, Order date, Adjustable until, Order reference, Publisher or Voucher code. By default the table will show all transactions for an Advertiser across all of their programs
-
Select the transaction(s).
-
Click Confirm.
-
Verify the transaction has been processed successfully.
Option 2: Confirm using a transaction upload
When approving multiple transactions in bulk. Full guidance: Transaction & Item Adjustments for Bulk Management | For Transaction Level Adjustments
-
View the Transactions tab
-
You don’t need to select any transactions, just click Download the Transaction Report to download all unprocessed transactions for the program.

-
In the downloaded file, populate the Action column with Confirm for each transaction.

-
Upload the file using Upload Adjustments. There is no limit to the number of transactions that can be adjusted.
-
Review the Upload History to confirm successful processing.
When should I use this?
✅ Approving whole orders
✅ Approving multiple completed transactions
✅ Finalising transactions after any item-level adjustments have been completed
How do I cancel transactions?
Use this when the entire order should be cancelled.
Important: Cancelling a transaction affects the entire order and all items within it.
Within Transaction Management:
Option 1: Cancel through the UI
(Use this if you are cancelling smaller volumes of transactions)
-
View the Transactions tab.
-
Locate the transaction(s).
-
Select the transaction(s).
-
Click Cancel.
-
Enter a cancellation reason if required.
-
Confirm the action.
Option 2: Cancel using a transaction upload
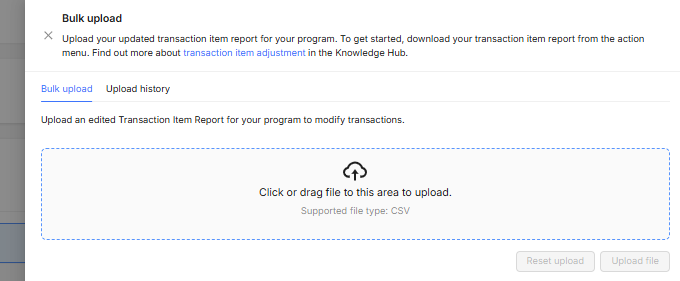
When cancelling multiple transactions in bulk. Full guidance: Transaction & Item Adjustments for Bulk Management | For Transaction Level Adjustments
-
Download the Transaction Report. This is a file where each row represents a whole transaction..
-
Populate the Action column with Cancel.
-
Complete the Change Reason field with a short reason for cancellation
-
Upload the file using Upload Adjustments.
-
Check Upload History for processing results.
When should I use this?
✅ Entire order refunded
✅ Order invalid
✅ Fraudulent transaction
✅ Duplicate transaction
How do I cancel items?
Use this when only part of an order needs to be removed.
Important: If all items within a transaction are cancelled, the entire transaction will become cancelled.
Examples:
-
Product returned
-
Product refunded
-
Partial cancellation
-
One item incorrectly tracked
Within Transaction Management:
Canceling an item through the UI
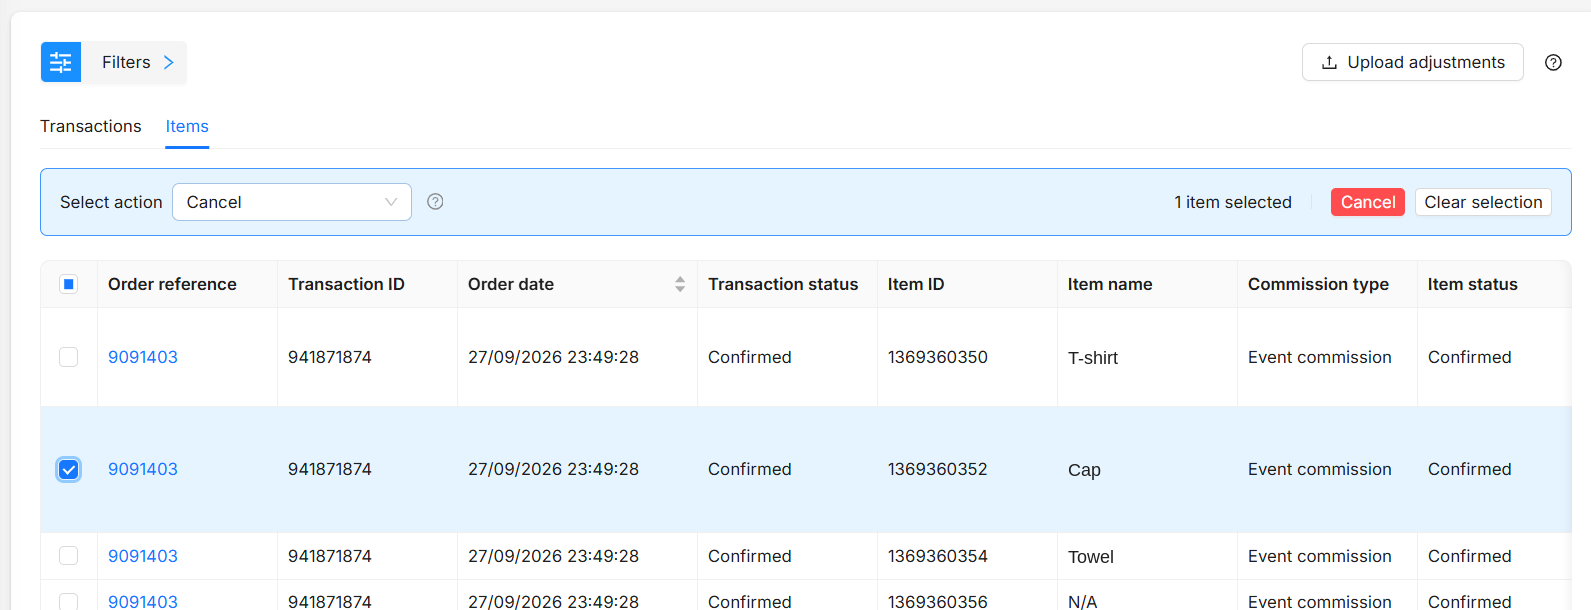
-
Find the transaction containing the item.
-
Open the Items tab.
-
Locate the item.
-
Select the item.
-
Click Cancel.
-
Confirm the action.
Canceling an item using a bulk upload
Full explainer and step-by-step guidance: Transaction & Item Adjustments for Bulk Management
-
Download the Transaction Item Report CSV which shows the item-level information for transactions.
-
In the file, make item-level changes and add the action ‘cancel’.
-
When you're done, upload the file to apply the updates.
-
Check back in the platform Upload History to see if the file has been processed successfully and correct any errors if necessary.
What happens next?
-
The selected item/s are cancelled.
-
Remaining items stay active.
-
The transaction value is updated accordingly.
When should I use this?
✅ Partial returns
✅ Partial refunds
✅ Single item cancellations
If the entire order should be cancelled, you can use Cancel Transaction options instead.
How do I adjust items?
Use this when an item remains valid but its value needs to change.
Examples:
-
Product price corrected
-
Partial refund applied
-
Commissionable value reduced
-
Item value updated after reconciliation
If you wish to edit/adjust Items individually within the UI, this is currently still possible in our older Transaction Report page, where you can select the transaction there and Edit the Item value.
Within Transaction Management:
Adjusting items via upload
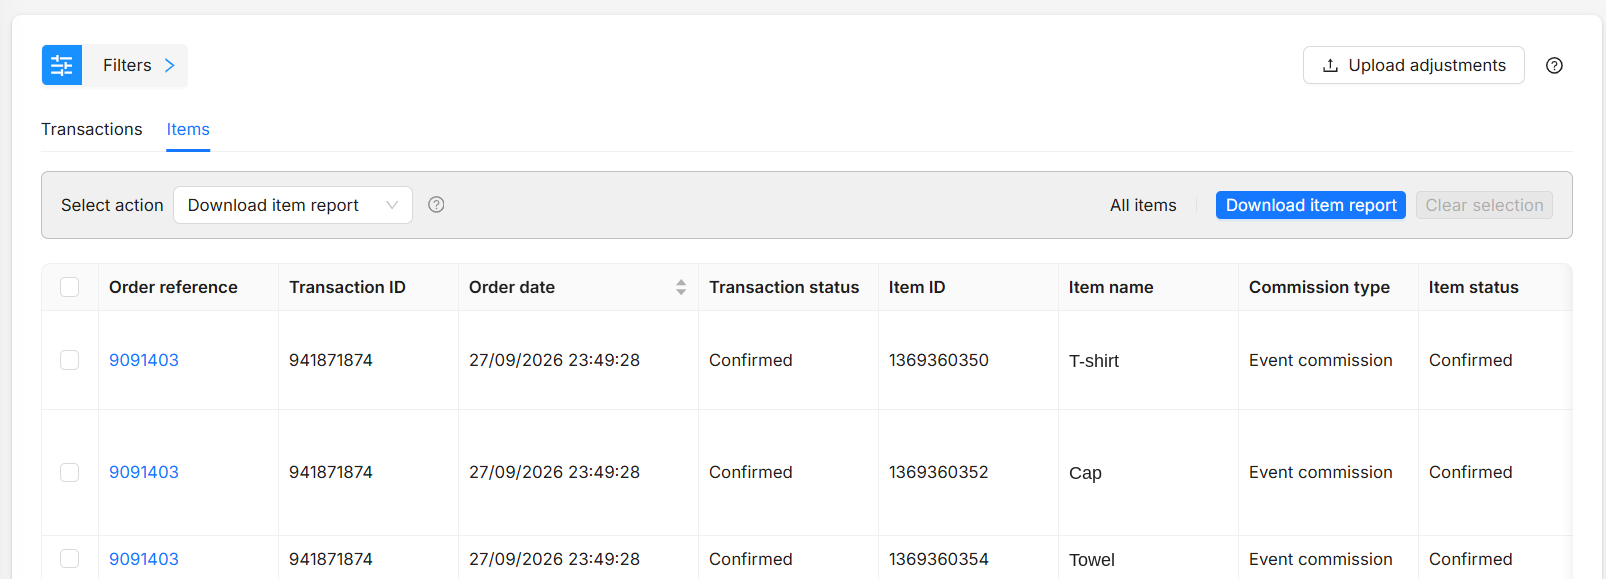
-
View the Items tab.
-
Download the Item Report.
-
Locate the item that requires adjustment.
-
Enter the new item value, action ('adjust') and adjustment reason.
-
Save the file.
-
Upload using Upload Adjustments.
-
Check back in the platform Upload History to see if the file has been processed successfully and correct any errors if necessary.
What happens next?
The system will process the adjustments and update the associated transactions accordingly.
When should I use this?
✅ Value corrections
✅ Partial refunds
✅ Commission adjustments
✅ Product-level changes
❌ Do not use for approving or cancelling an entire order.